
WINDOWS / 0.57.0 / EN
Creator Handbook
From your first line to a standalone Windows game. Step-by-step tasks, production tools and checks.
07 OCT 2026 · max.trokay@gmail.com
Contents
01. Start Here02. Your First Playable Story03. Find Your Way Around04. Assets and Safe Replacement05. Dialogue, Choices and the Story Graph06. Exploration, Props and Inventory07. Conversations and Consequences08. Close-up Inspection and Discoveries09. Journal, Phone and Investigation10. A Map with Story Rules11. Light, Materials and Flashlights12. Rain, Snow, Dust and Fog13. Motion and Animation14. Camera Shots and Cutscenes15. Temporary Worlds and Audio Perception16. Style the Game, Not the Editor17. Reusable UI Packs18. Test States and Story Checks19. Save, Transfer and Export20. Troubleshooting and Release ChecklistNo matching chapter.
01. Start Here
Creator handbook · Windows edition · 0.57.0
TROK ENGINE is a visual editor for 2D visual novels and narrative exploration games. Build scenes, write dialogue, connect choices and configure interactions through the editor. This handbook takes you from the supplied learning project to a standalone Windows game, then introduces the production tools.
Install and open
- Download TROK ENGINE Preview. Extract the entire ZIP to a writable folder, such as
Documents/TROK Engine. Do not run the application inside the archive. - Launch
TROK Engine.exe. Keep its neighboring files and folders together. Node.js and the editor source code are not required. - Choose English in the welcome dialog. The editor also offers Russian and Ukrainian. Changing editor language does not translate your story.
- Select Quick start tutorial, or Continue without tutorial to begin with one blank scene. The tutorial is optional.
- To return later, open Project menu (three dots) → Learning and help.
Free Preview before 1.0
TROK ENGINE Preview 0.x is free, with all current authoring tools and optional support. There is no three-scene Demo restriction or export watermark. The current technical limit is 300 scenes per project. No activation, subscription or expiry. You may release commercial games without engine royalties.
Downloaded 0.x builds keep working after 1.0. You can keep making and selling games with them. Keep your build archive and project backups; future updates and hosted downloads are not guaranteed.
At 1.0: a free evaluation Demo (up to 3 scenes and an export mark) and a one-time paid Full without those Demo restrictions, subscriptions or royalties. Price and release date are not announced.
Early support: any successful payment on the official TROK ENGINE itch.io product page before the public 1.0 release gives you Full 1.0 at no extra cost. Keep your receipt or download key. Downloading for free alone does not grant Full 1.0. Payments elsewhere are not included. Optional asset packs are separate products.
See the included TROK-PREVIEW-LICENSE.txt for the Preview and runtime distribution terms. Check third-party art, audio, font and pack licenses separately.
Version scope: screenshots use the shipped 0.57.0 Windows build. This is a practical workflow guide, not a promise that every combination of advanced features is error-free. Keep backups and test the exported game.
02. Your First Playable Story
Outcome: a three-scene story with an edited line, a choice and two endings. No imported artwork is required.
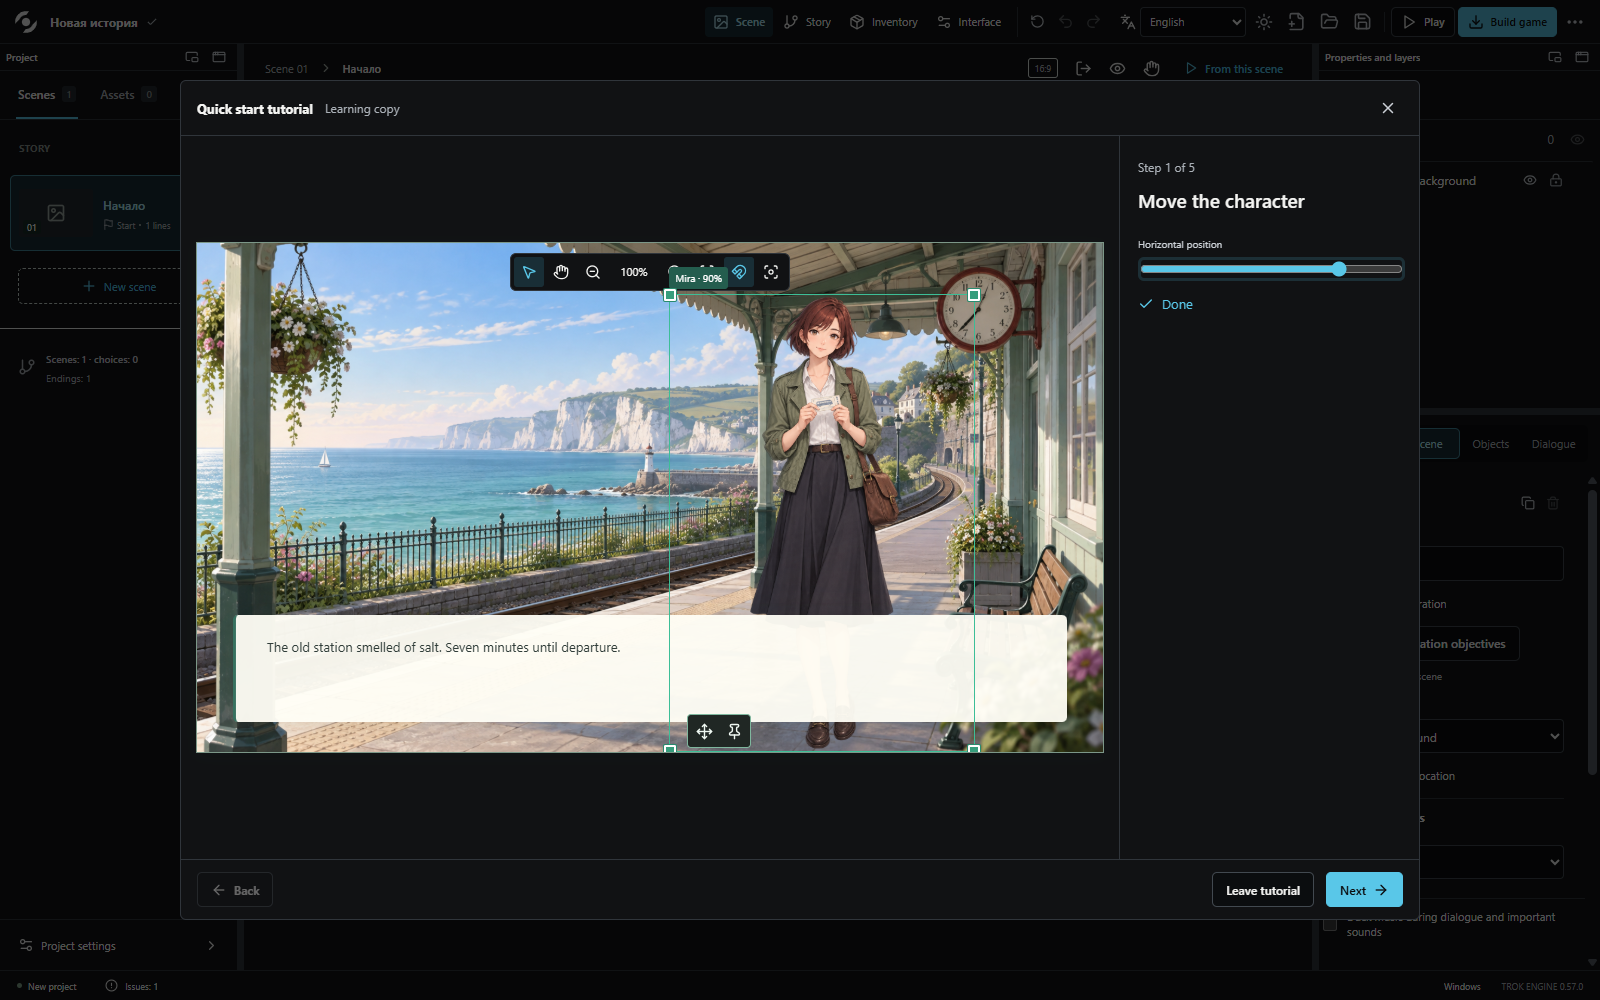
- Open Quick start tutorial. It creates a learning copy of Seven Minutes to the Sea, separate from your current project.
- Move Mira using Horizontal position, or drag her on the stage. The next step becomes available after a change.
- Click Next. Replace Practice dialogue, for example with “The sea could wait. The last train would not.”
- Click Next and change Practice choice to “Take the coastal path”.
- Click Next, then Play. Read the dialogue and choose the coastal path. Mira should answer that someone else can worry about timetables.
- Click Back to editor, then Next. Choose Save learning copy and a new filename, such as
My First Story.novel. Canceling the file dialog does not complete this step. - Choose Open learning copy in editor to continue working with it, or Done to return to your previous project.
- Play again and choose Catch the train. Check that the other branch opens. You have tested both outcomes, not just the first screen.
Keep the pair together: saving creates My First Story.novel and My First Story.novel.resources. The folder contains the media. Moving only the .novel file is not a complete transfer.
Leaving the lesson does not replace your current project, recovery backup or ordinary game slots. The welcome dialog appears once per profile; the lesson remains available through the project menu.
03. Find Your Way Around
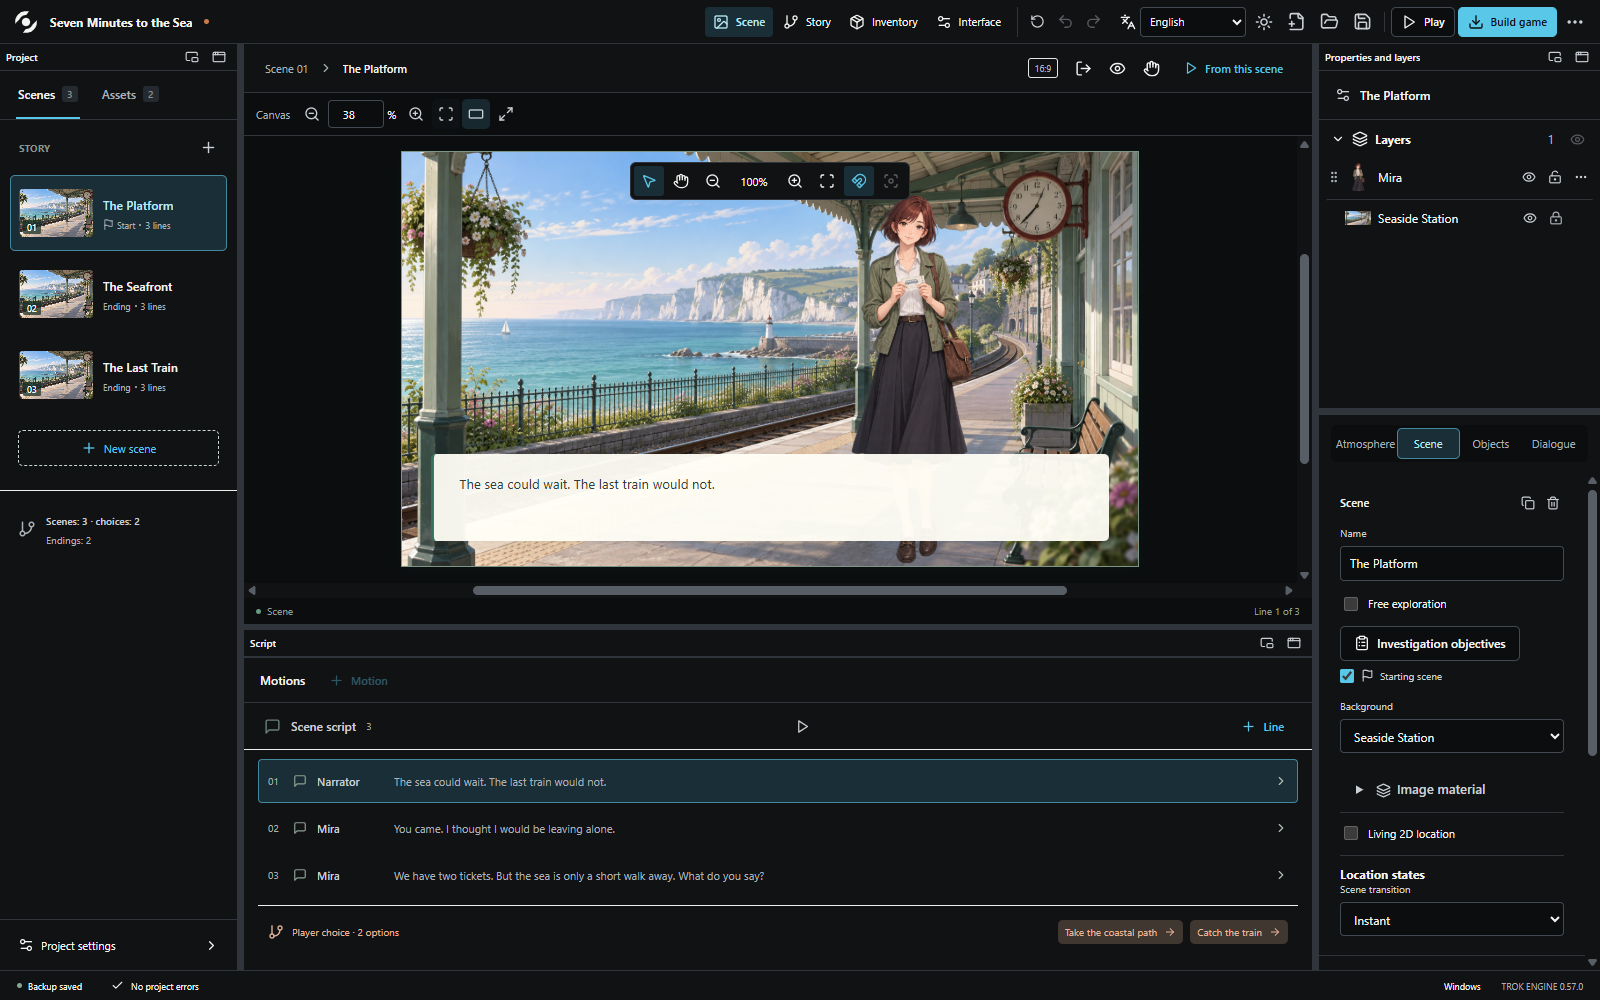
The main workspaces are Scene, Story, Inventory and Interface. On the Scene workspace, the left panel holds scenes and assets, the center is the stage, the bottom is the script, and the right panel holds layers and properties.
There are three different views
- Canvas controls above the stage change the working canvas size. Use Fit entire canvas to restore a complete view.
Ctrl+ mouse wheel changes this workspace scale. - The toolbar inside the stage changes the authoring view of the scene. This lets you inspect small details without changing the player's saved camera framing.
- Player view, in a living 2D location, is the actual game-camera composition. Use this view when saving camera shots, not the workspace zoom.
To pan the workspace, move focus away from a text field, hold Space, then drag with the left mouse button. Release Space when finished. The hand tool and middle-button panning are also useful inside the scene view.
Drag panel dividers to resize them. Panel-header controls can float a panel inside the editor or open it in a separate Windows window for a second monitor. Use the docking controls to return it. These are editor arrangements, not game layout settings.
Before editing: check the selected scene, line, object and location state. A property can be correct but apply to the wrong selection. Undo is an editing tool, not a replacement for a saved backup.
04. Assets and Safe Replacement
Import a background and a character
- In Scene, open Assets in the left panel.
- Choose the appropriate category: backgrounds, characters, props or audio. In the all-assets view, select the import type first.
- Import a supported file. Use PNG for transparent characters and props; supported image formats also include JPEG, WebP and GIF. Audio accepts WAV, MP3 and OGG.
- Select the scene. In its properties, choose the imported background.
- Add the character or prop to the stage, then position it. Additional expressions belong to the same character as portraits, not separate story identities.
- Name assets and group related files in library folders before the project becomes large.
Replace temporary art without rebuilding behavior
- Find the original resource in Assets.
- Open Usages to inspect its references.
- Click Replace image and select the replacement file.
- Recheck every affected composition, then save a new checkpoint of the project.
The resource ID and references remain: objects, reactions and inventory links are not intentionally recreated. However, different proportions or transparent margins can change the visible composition. Living-location dimensions and camera coordinates are recalculated when the background resolution changes.
Material maps must match the new image dimensions. A mismatch is rejected; prepare matching maps or deliberately remove the old ones first. Replacing art or changing the story can invalidate old test states or game saves.
Rights and performance: import only files you may distribute. Large transparent images, many animation frames and high-resolution material maps cost memory even when the project file itself is small. Test a representative heavy scene early.
05. Dialogue, Choices and the Story Graph
Edit the learning project
- Select The Platform in the scene list.
- Select a line in the bottom Scene script. In the Dialogue inspector, edit its text and speaker.
- Use Line with the plus icon to add another line. A narrator can have no character portrait; a named character can use its linked portrait.
- In After dialogue, use a choice when the player should decide between scenes. Give each answer readable text and an explicit destination.
- Open Story to inspect the scene graph. Connect the output of a scene or choice to the intended scene input. Moving a graph card alone does not create a story transition.
- Mark the intended opening scene as Starting scene.
- Click Play to start from the beginning and test every branch, including an ending with no outgoing transition.
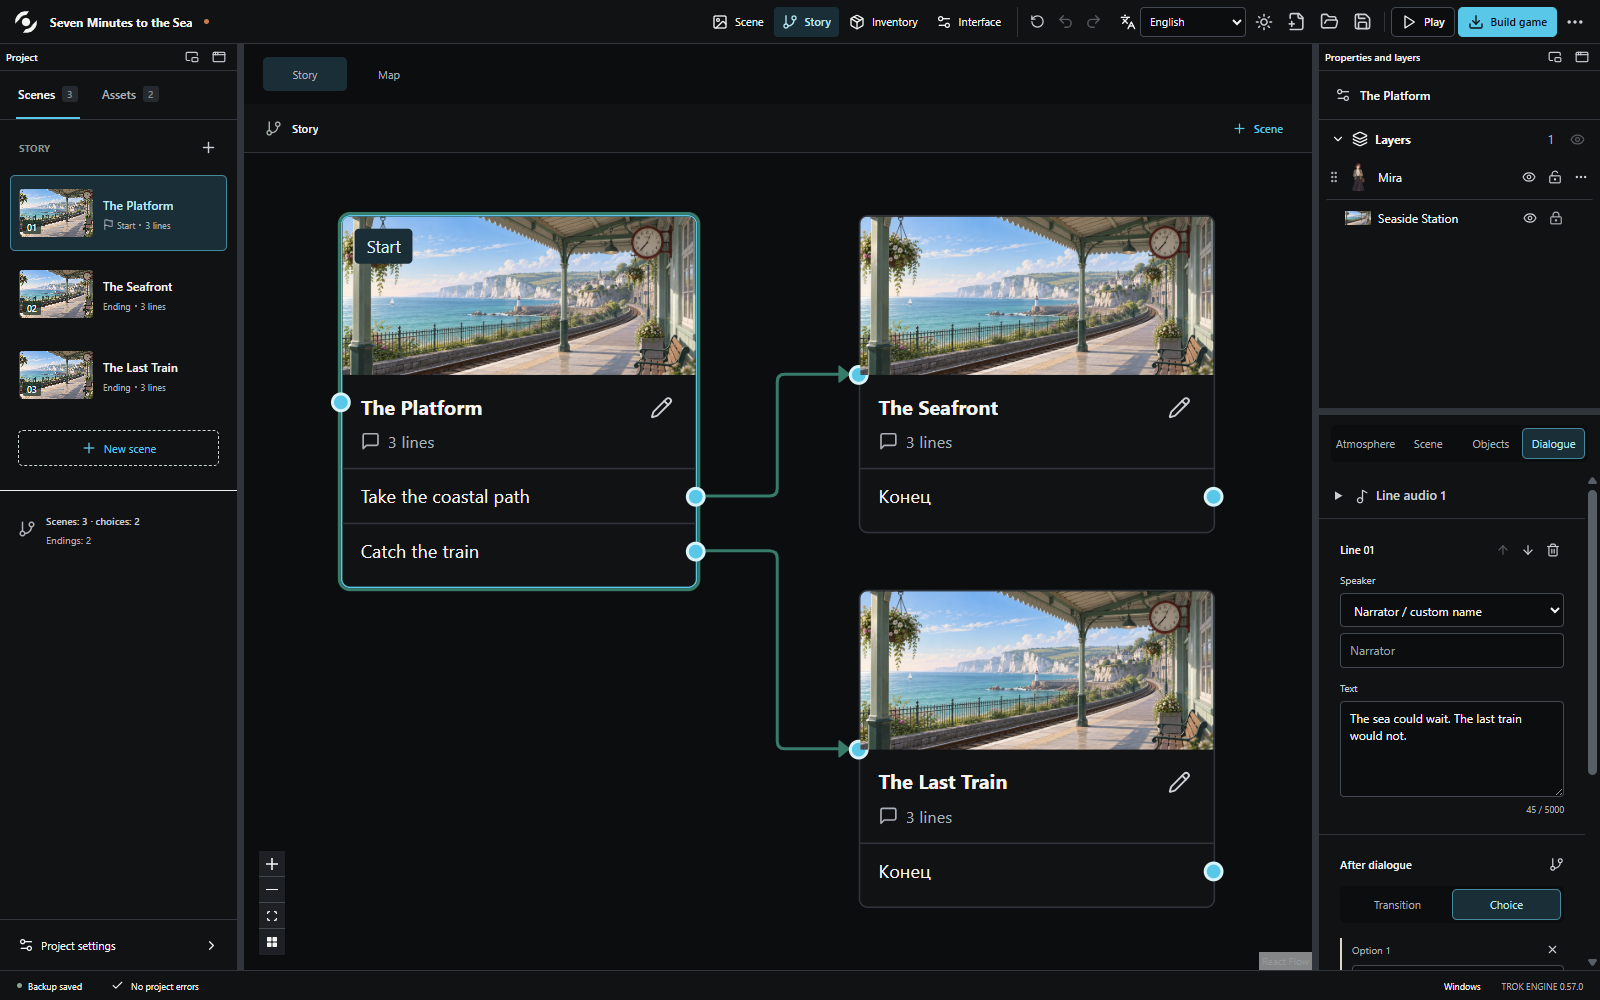
Two graphs, two jobs: the Story graph links scenes. A character's conversation graph links dialogue nodes inside a scene. Use a conversation for repeatable questions and conditional topics; do not create an entire scene for every response unless the scene composition really changes.
Decisions, inventory, discovered details, relationships and numeric stats can gate supported choices. Create the referenced decision or stat in project settings first. Add one condition at a time and test both its false and true states. Never hide every response without a valid way to continue.
06. Exploration, Props and Inventory
Goal: clicking a key gives an inventory item; the key opens a door.
- Save a copy before converting an existing dialogue scene. Prepare an exploration scene with a single base composition and no scene-ending choice list, then enable Free exploration.
- Import a key as a prop, place it on the stage and select it.
- In Objects → Behavior, select Collectible. Check the linked inventory item and response text. In Inventory, name the item and leave its initial ownership off.
- Add an exit hotspot over the drawn door using the stage's exit-zone control. Name it and set its destination.
- Change its behavior to the item-unlocked passage template. Select the key, the destination and whether the key is consumed. Add a clear response for trying the locked door.
- Play: try the door without the key, pick up the key, then select/apply the inventory item to the door. Check that the transition works and pickup does not duplicate the item on return.
Ready-made behaviors cover inspection, pickup, passage, item use and passwords. Selecting a template can replace existing reactions: read the confirmation before accepting it. Use manual reaction chains when you need additional conditions or ordered consequences.
A prop is an image in a scene; an inventory item is a separate game object. Giving an item through a manual action does not automatically hide the prop. A pickup template handles both.
Use Layers to name objects, reorder them, hide or lock them while editing. Groups help move related objects together. Editor hotspot outlines are authoring aids; always check their actual appearance in the game.
Preview: this exercise is not limited to three scenes; the current technical limit is 300.
07. Conversations and Consequences
Add a repeatable conversation
- Place a character in an exploration scene and select it.
- Choose Add conversation. Select the initial node and enter the line text and speaker.
- Add a question node, then an answer with a destination node. Add an answer that returns to exploration.
- For a topic that requires a clue, add the discovered-detail condition to that answer. Check that it is unavailable before the clue and available afterward.
- Add consequences only where the player actually commits to an action: set a decision, change a stat or relationship, or give/remove an item using the available controls.
- Play from the beginning to confirm the required clue or decision really becomes obtainable.
Present evidence
In the conversation editor, use its evidence section to enable evidence reception. Add a reaction for an existing source and link it to a prepared dialogue node. Configure responses for unsuitable or repeated evidence. Test with a possessed item or an actually discovered journal entry; an editor preview of the full catalogue is not player ownership.
Evidence can also come from supported dossier information, read messages and deductions. The conversation's evidence response is configured per source, not independently for every topic. Do not assume a fully automatic interrogation system.
Keep actions understandable
An action chain runs in order, but animation or effect actions may continue in the background unless their wait option is enabled. Put a reward after the blocking action if it must happen only once the animation or conversation finishes. Check repeatability and one-time conditions to prevent duplicated rewards.
Debugging order: selected object → active reaction → trigger → conditions → action order → destination. A visually correct arrow does not prove a condition can ever become true.
08. Close-up Inspection and Discoveries
- Import a readable close-up image of a document or object.
- For a stationary object, choose the close-up behavior. For a collectible object, keep its pickup behavior and attach an inspection to the linked inventory item.
- Open the inspection editor, name the inspection and select its image.
- Use the draw-detail tool to mark a region. Give it a name and description. Enable its journal option when the discovery should become an evidence entry.
- Add consequences under the discovery action chain, such as a line, a brief thought, a decision or an observation. A short thought disappears without a Next button.
- Return to the game. Pick up the object if necessary, open the inspection and discover the region. Confirm that simply owning the object did not already award the hidden fact.
An inspection can have multiple authored views and interactions, such as a closed and opened state. Each view needs prepared artwork; the engine does not infer the back of a photographed object. Password and item-use interactions use their own result settings.
Dialogue can stay over the close-up rather than requiring the player to reopen it after a comment. Verify long text, image zoom and the return to exploration together.
For a UV-only detail, prepare the hidden image, align it with the visible view, enable UV discovery for the detail and configure the inspection flashlight. Check both normal and UV modes. Transparent empty pixels should not count as the hidden clue.
Testing boundary: the one-discovery preview is a focused rehearsal. It does not prove that the player can acquire the necessary item or reach the inspection through the real story. Test that route separately, including a save and reload after discovery.
09. Journal, Phone and Investigation
Add an observation
- Open a reaction or scene-event chain and add Add observation.
- Enter a short title, text and optional source.
- Choose what it represents: something seen, someone else's words or a hypothesis.
- Trigger it in the game and open the journal. Check that the category and source make its meaning clear.
An observation is not automatically proof. Repeating the same action does not duplicate its entry; copying the action creates another entry. For a story condition based on an observation, use an explicit decision flag alongside it. A discovered inspection detail is a different kind of fact.
Use the phone presentation
- Open Interface → Journal → Dossiers and chats.
- Choose the phone presentation and enable messages. Add a dossier for a library character.
- Give the first contact an achievable availability condition; use availability from the start for initial testing.
- Add a message, its unlock condition and optional player replies. A later message can depend on a particular reply.
- In Interface → Game screen, ensure a journal command is available; its visible caption can say “Phone”.
- Play both reply branches independently. List order is display order, not an automatic message sequence.
Objectives and deductions
Use the scene's Investigation objectives control for tasks and completion conditions. Under Interface → Journal → Deductions, define which supported evidence sources lead to a conclusion, then test before and after both sources are found. Avoid circular dependencies: a clue needed to unlock a conversation must not be obtainable only after completing that same conversation.
Appearance is separate from content. A phone image alone does not switch the journal to the phone presentation. See chapter 16 for layouts and styling.
10. A Map with Story Rules
- Open Story, switch the story view to Map, and enable the in-game map.
- Select a map image, or deliberately keep a list-only map. No image means the game shows a location list; this is not a missing automatic geography generator.
- Add a location associated with an exploration scene. Position its marker and give it a readable label.
- Set the conditions under which the location becomes known. With no reveal conditions, it is known from the beginning.
- Separately set the conditions for traveling there now. Write the reason shown when travel is blocked.
- Configure shared travel conditions if all free travel should close after a story event.
- Play before discovery, after visiting and after the travel condition becomes false again.
Keep these states separate
| State | Meaning |
|---|---|
| Known | The player has learned that the place exists. |
| Visited | The linked scene has already been entered. Visiting also makes it known. |
| Available now | The place is known and current local and shared travel rules allow the trip. |
Knowing or visiting a place does not bypass a later travel restriction. All conditions within the relevant rule block must be satisfied. A numeric “Chapter” stat can serve as an authored chapter gate; there is no need to invent a separate built-in chapter manager.
Use a location-travel behavior when travel should respect map rules. A direct scene transition is a different operation and should not be used accidentally as an unlocked shortcut.
Map colors and marker presentation belong to Interface → Game style. Those visual settings do not create locations or change their story conditions.
11. Light, Materials and Flashlights
Light a scene
- Select the scene and open Atmosphere. Establish the ambient lighting and color treatment first.
- Add a local light and adjust its position, size, brightness and softness. Use the receiver controls to choose which layers it affects.
- For image relief, open Image material on the background or selected object. Import a normal map with matching dimensions; choose the appropriate OpenGL/DirectX convention.
- Add roughness or emissive maps only when the artwork needs them. Move the light and inspect the result rather than judging the maps in isolation.
Materials belong to the resource. Changing a shared image material affects its uses across the project. Separate resource copies are needed for independent material variants. Normal maps change lighting, not the silhouette or hidden geometry of the image.
A player-controlled flashlight
- In an exploration scene, open Atmosphere → Player flashlight.
- Choose and enable the required normal/UV modes. Set radius, intensity, softness and color.
- Optionally require an inventory item and a decision. Both requirements must be met if both are configured.
- Include the background in the affected layers when it should be illuminated.
- Use authoring preview to aim the light while adjusting it. Return preview to off before placing objects.
- Play the real route. Use
Ffor the ordinary light andUfor UV where the tools are available.
Prepare UV-only props or a hidden UV image on a visible object, then align the two images. Discovery can set a fact and trigger a reaction. Editor preview bypasses access requirements and does not award discoveries.
Limits: this is artistic 2D lighting, not physical ray-traced visibility, battery simulation or a way to rotate around a flat image. WebGL-dependent effects must be checked on the target computer.
12. Rain, Snow, Dust and Fog
- Select the scene and add a particle effect from its atmosphere tools.
- Pick one of the four presets: rain, snow, dust or fog.
- Position the effect's area on the stage. Set its size and aspect ratio, then choose a rectangular or elliptical region.
- Adjust particle amount, individual size, speed, wind, opacity and color. Keep initial values modest.
- In the area/attachment controls, adjust edge softening. Fog defaults to a soft edge; zero restores a hard crop.
- Position the effect in Layers. For rain behind a window frame baked into a background image, use an alpha mask or separate frame layer; ordering alone cannot separate parts of one flat picture.
- Optionally attach the effect to an object, or restrict which lights illuminate it.
- Play, pause, save and reload while the effect is running. Check both appearance and performance.
Masks and scripted weather
A mask uses transparency, not black versus white. Opaque pixels reveal particles; transparent pixels hide them. A solid black PNG is therefore not a cutout mask. The mask is stretched over the effect area, so align it carefully.
For weather that starts later, turn off automatic start. Add a particle-control action to a scene event or reaction: enable, disable or change intensity. A fade can continue without blocking the next action; add an explicit wait when the timing matters.
Expected boundaries: these are procedural 2D effects, not a general particle-curve editor. There are no particle collisions, snow accumulation or physically volumetric fog. Large overlapping fog clouds are expensive. Reduced-motion settings can freeze the visual phase; a missing WebGL renderer has no equivalent CPU particle fallback.
13. Motion and Animation
Move an existing object
Use the Motions area in the scene script to configure an existing object or group movement. Define the start/end composition and timing, then choose once, repeat or back-and-forth as appropriate. Launch the motion through the existing reaction/event actions when it should respond to the player.
For ambient life, use the selected object's animation controls: subtle sway or vibration can animate a single image. A feedback preset can communicate rejection or activation. Keep these effects small enough that clicking a target remains comfortable.
Open a box with authored frames
- Prepare consistently aligned PNG/WebP frames with the same canvas dimensions.
- Select the prop and open its object animation section, then frame animation.
- Import/add frames, check their order and set frames per second.
- For a box opening once, turn off repeat and automatic start.
- In its reaction, add a frame-animation action targeting this object and the forward direction.
- Enable the wait-for-completion option. Place the reward or reveal action after it.
- Test opening, a repeated click and save/reload midway. For closing, use the reverse direction and the appropriate state/condition.
Without the wait option, animation and following actions can run concurrently. Sound cues may be attached to frames; test their timing with actual audio output. The current frame animation supports up to 64 frames per object, within the project's resource limits.
Art requirement: the engine does not synthesize intermediate drawings. Moving or shaking one PNG is possible; changing a character's expression or opening a lid requires prepared frames, portraits or separate layers. GIF playback is not a substitute for an event-controlled frame sequence.
14. Camera Shots and Cutscenes
Save two shots
- Use an exploration scene with Living 2D location enabled.
- Switch to Player view on the scene toolbar. Set the actual game camera position and zoom.
- In scene properties, find Camera shots and save a named shot, such as “Window”.
- Frame another detail and save a second shot. The eye button previews a saved shot; the camera button replaces it with the current player view.
Build a short sequence
- Open Script → Scene events, create an on-entry event and enable staging.
- Add a camera-shot action, choose the first shot and set the transition duration. Zero is a cut.
- Enable waiting for the transition if the next action must start afterward. Add a line or launch an existing character conversation.
- Add a pause for a deliberate hold, then transition to the second shot.
- End with restoring the original view or handing the current camera back to the player.
- Rehearse the event, then test the actual scene entry normally. Rehearsal bypasses trigger conditions.
The camera holds the reached shot until an explicit return/handoff or scene change. Staging controls interaction; configure the allowed tools when mixing a sequence with short player tasks. Author checkpoints can mark an intentional save point in the action chain; they are not editor test states.
For a fade, add a screen transition to black or white at full opacity, then a matching transition back to zero. A blackout can persist across a scene change: the next scene must reveal it. It covers the scene, not dialogue and the pause menu.
Not a 3D camera: a ceiling shot, reverse angle or fly-through needs appropriate backgrounds/layers. Save and reload during the sequence to verify its continuation.
15. Temporary Worlds and Audio Perception
Temporary story contexts isolate a dream, memory or subjective episode from its parent world. They are more than a hidden inventory.
A safe dream route
- Prepare a normal room and a dream scene. Give the player a normal item, such as a phone, through the normal story.
- In the sleep reaction, add Enter temporary context, name it and explicitly choose the items available inside.
- Set any required temporary decisions/stats after entering. Finish with an explicit transition to the dream scene.
- In the dream, add observations or facts. Optionally use an audio-perception action such as underwater, muffled or distant.
- In the wake reaction, add Exit current context. Select only the decisions, observations and discovered facts that should be carried into the parent context.
- Add an explicit transition back to the room. Grant any intended new item or stat change after the exit, not before it.
- Test: enter → find two memories → select one to carry → save mid-line → restart → load → exit. Check the phone, parent stats, chosen memory and normal sound.
Contexts can nest up to eight temporary levels. Each exit returns to the immediate parent; a memory must be explicitly carried across each boundary. Exiting without an active context is invalid. Starting directly in a dream scene does not create the missing parent state. Capture a test state after entering through the real route instead.
Sound is authored separately
Set scene music and ambience in scene properties; use event/reaction audio actions for changes and one-shot effects. Import licensed recordings. Audio-perception presets filter existing playback; they do not generate sound. Restore normal perception when the episode ends, unless context exit restores the parent's state. Check mute, volume and dialogue ducking in the exported game.
16. Style the Game, Not the Editor
Editor dark/light theme and game appearance are separate settings. A dark editor does not guarantee a dark journal in an older project.
- Open Interface → Game style, enable the game style and select the global theme.
- Set a readable palette, font roles, spacing and background images. Preview the result with both short and long text.
- Select a specific screen. Choose inherited global styling, a custom screen style or legacy styling deliberately.
- Under element/state settings, choose a role such as a choice or save slot, then its normal, hovered, selected or disabled state. Only meaningful states apply to each element.
- Add project fonts if needed. TTF, OTF, WOFF and WOFF2 are supported; record their licenses and verify all required language glyphs.
- Test the real journal, map, inventory, dialogue history and save/load screens through Play, not just the palette preview.
Layout versus skin
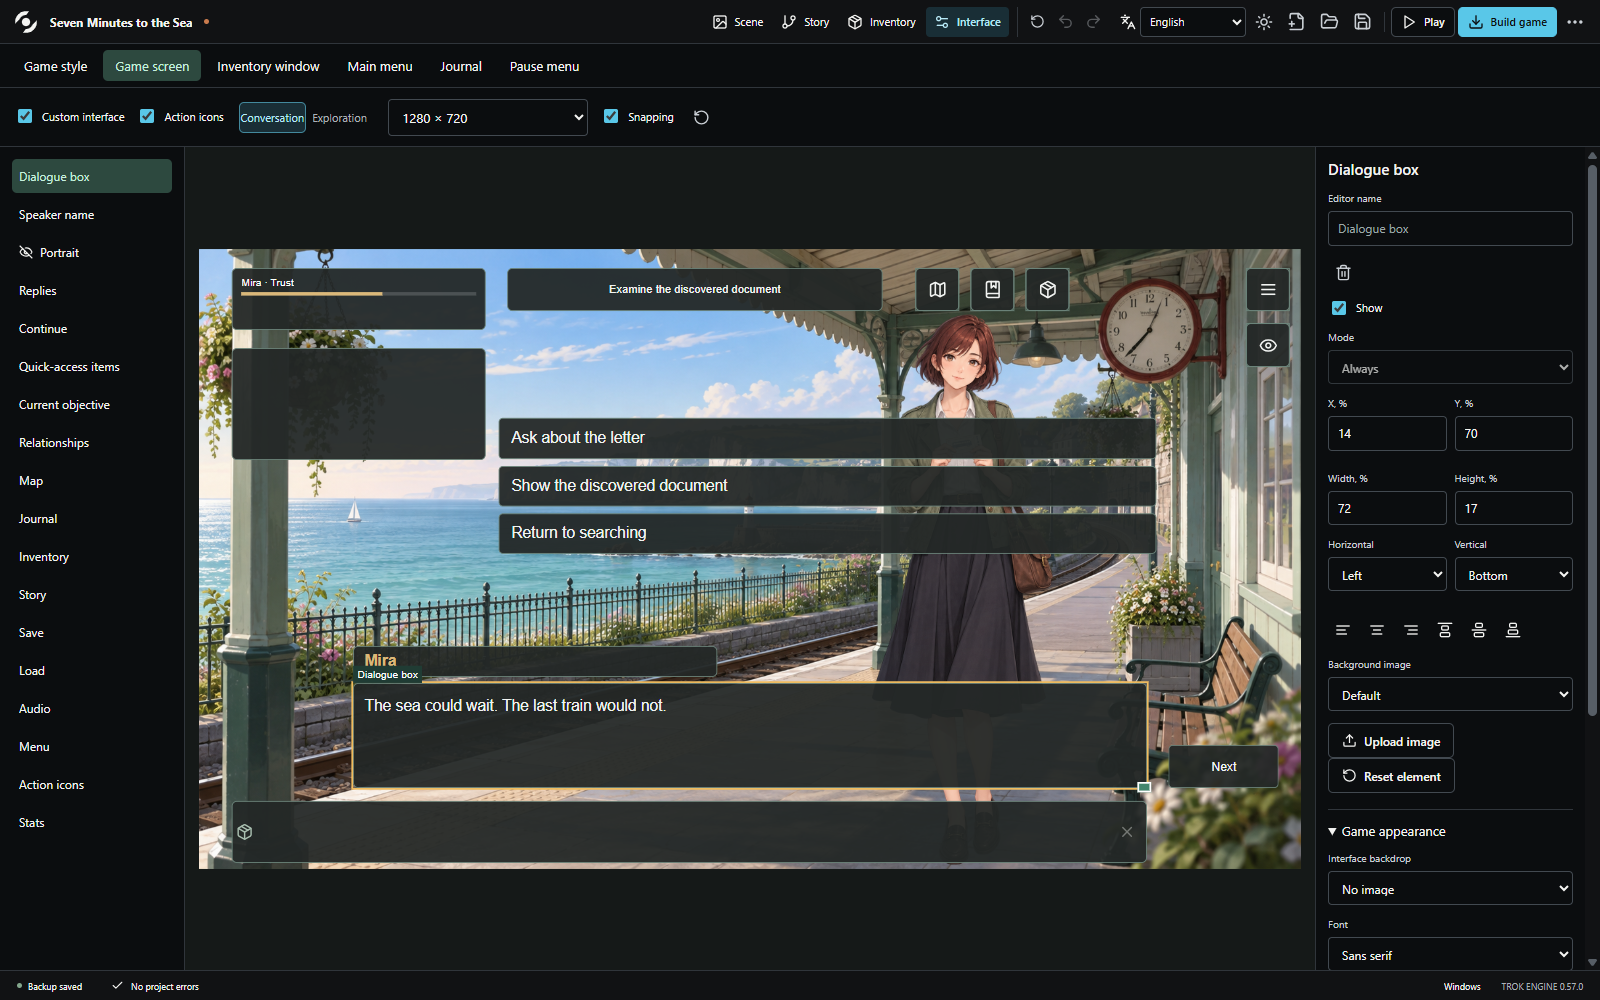
Free-layout tools exist for the game screen/HUD, inventory, main menu, journal and pause menu. Other screens expose their supported styling and roles, not an arbitrary HTML editor. Changing a skin does not change story logic.
Custom icons, cursors, UI sounds, text roles, nine-slice frames and supported system captions can be configured. Prefer live text over text baked into images. Keep important controls reachable at small resolutions and avoid hover states that change element size.
For the phone, configure its presentation under the journal's content settings as well as its appearance. For the map, supply a map image separately. Neither asset is created just by applying a global texture.
17. Reusable UI Packs
A .trokpack shares supported interface styling and its dependencies. It is not a complete game, a store connection or a script plugin.
Export your own pack
- Finish and test the appearance in Interface → Game style.
- Open the UI-pack section and select the screens to include. Include free layouts only when they are intentionally part of the pack.
- Enter a stable pack ID, title, version such as
1.0.0, author and license. - Review rights to every included image, font and audio file. A menu background can still contain private story art even though no scenes are exported.
- Confirm the rights checkbox and export
.trokpack.
Import without losing local work
- Save a backup of the target project and open
.trokpackfrom the same section. - Read the pack's scope and license. Uncheck screens you want to keep.
- Preview the pack. Preview alone does not apply it.
- Choose library-only import if you only need its media/fonts. Otherwise inspect the replacement list, especially screens marked with local changes.
- Confirm the listed changes and apply the pack. Save the project normally afterward.
Undo can restore the previous project state during editing. Pack updates use the same pack ID with a new version; they do not merge arbitrary hand-edited layouts. Choose whether to preserve or replace each affected screen.
The format validates dependencies and checksums and does not accept arbitrary JavaScript, HTML, executable files or external network assets. This validation is not a guarantee that imported art is licensed or visually suitable. Test long captions, focus/disabled states, small windows and your actual gameplay before shipping.
Commercial note: any distribution or sale of a pack needs explicit rights to its contents. Engine purchase and third-party asset/font licenses are separate matters.
18. Test States and Story Checks
Save an author test state
- Click Play and reach the intended situation through normal gameplay.
- In the preview's lower controls, enter a set name and use the capture-test-state button.
- Return to the editor and save the project.
- Open Project menu → Test states, select the set and launch from it.
The snapshot includes progression, items, decisions, findings and context parents. It is stored in the project, not as an ordinary player save slot. Test-state playback uses temporary slots and does not bypass event conditions. You can edit exposed values, but do not manually force a stale snapshot's compatibility fingerprint.
Check a route
- Open Project menu → Story checks and add a named route.
- Add required scene events in the intended order.
- Play the route and open Availability check in the preview.
- Review missed steps, wrong order, blocked map destinations and their actual conditions. A step counts when its event chain finishes, not merely when it starts.
Static warnings can identify suspicious context transitions, but they cannot prove every possible branch. Route checks inspect the events you explicitly list, not the quality or completeness of the story.
Use all four levels
| Check | What it tells you |
|---|---|
| Editor preview | Composition and local appearance |
| Event/discovery rehearsal | A focused chain can execute |
| Normal Play / test state | Conditions and stateful progression work |
| Fresh exported Game.exe | The packaged player works with shipped resources |
After story or resource changes, replay and capture new test states when old ones become incompatible. Author test sets and route definitions are excluded from exported games. Do not treat technical checks as a substitute for an external player's complete playthrough.
19. Save, Transfer and Export
Three independent saves
Project Save stores the authored game. Recovery protects unsaved editing work locally. Game slots store a player's progress. Author test states are a further testing facility; none of these replaces the others.
- Save a project with the toolbar save command or
Ctrl+S. Use Save as for a separate checkpoint before risky changes. - Back up the
.novelfile and its same-named.novel.resourcesfolder together. - Transfer both to a new folder and reopen the
.novelthere. Check that images and audio load before deleting any old copy. - Resolve project errors, then choose Build game → Choose folder and build.
- Launch
Game.exein the generated folder. The player does not need the editor installed. - Test both choice branches, interaction conditions, save/load, sound and every enabled game screen. Repeat after a fresh export, not against yesterday's executable.
- Zip and distribute the entire generated game folder. Do not send only
Game.exe.
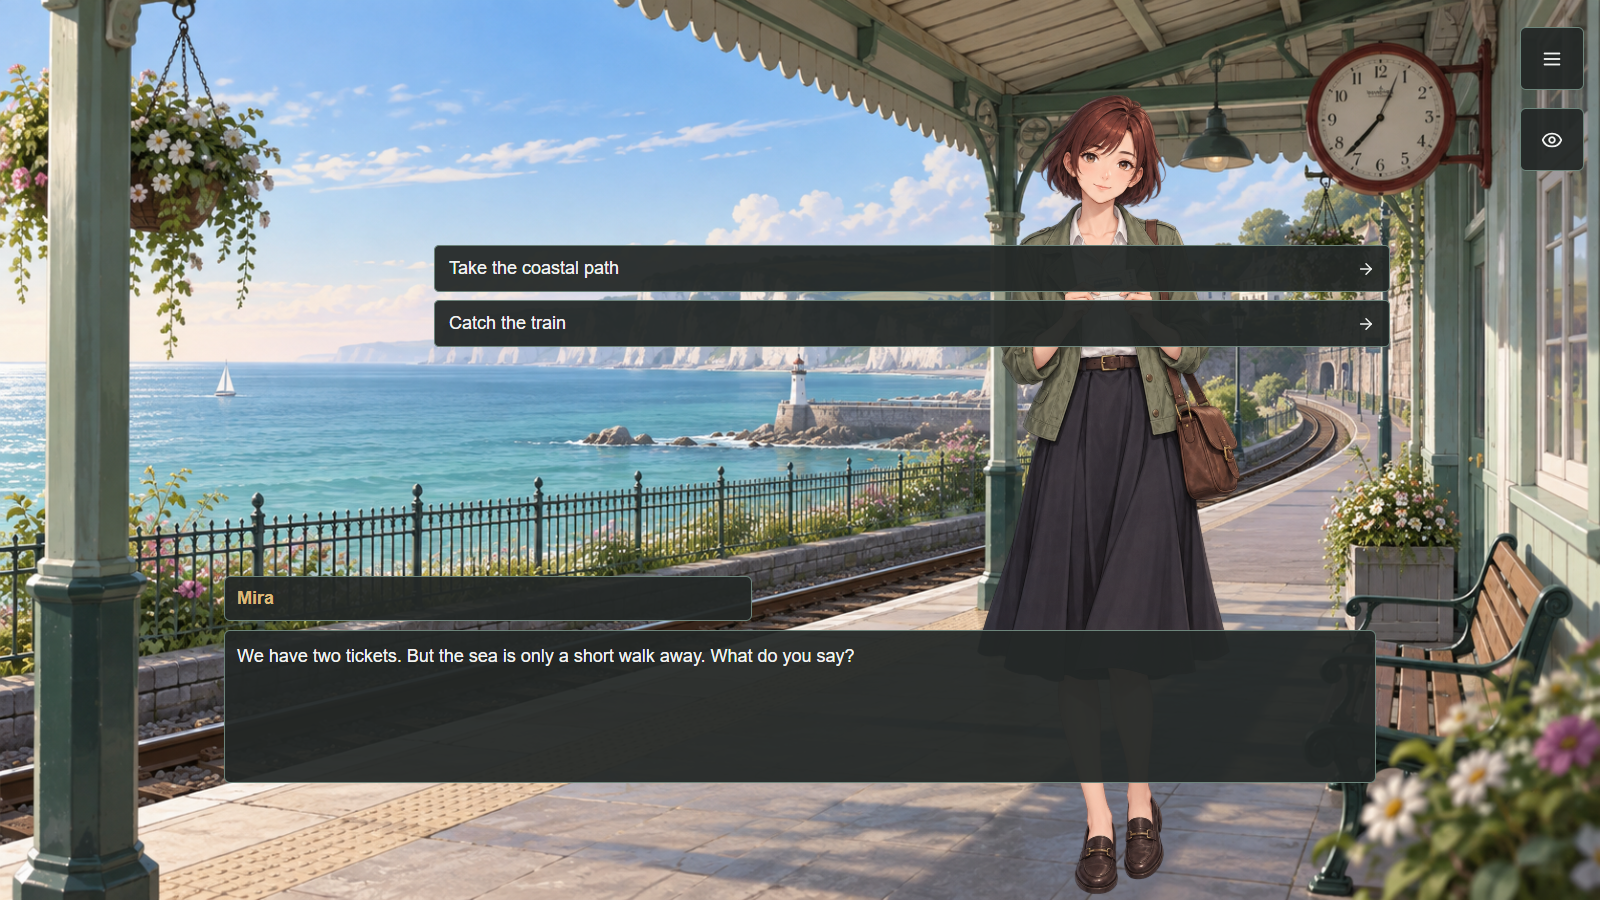
In the game, use the pause menu for save/load and supported audio/display settings. Display settings can control window/fullscreen behavior and resolution; verify the result on the player's monitor. Test dialogue and buttons at both small and large sizes.
Story edits can affect save compatibility. Preserve a matching old game build if you need to investigate an old slot. A UI palette change is not the same as a structural story revision. Never promise old-save compatibility without testing the exact update.
20. Troubleshooting and Release Checklist
| Symptom | Check first |
|---|---|
| Images missing after transfer | Is the matching .novel.resources folder beside the project? |
| Canvas too large or clipped | Use Fit entire canvas; distinguish workspace zoom from player camera. |
| A button or reaction does nothing | Check selected object, trigger, all conditions and item ownership. |
| A map is just a list | Choose a map image in Story → Map; styling is separate. |
| White journal in a dark editor | Check Game style, screen inheritance and legacy mode. |
| Phone skin did not appear | Check phone presentation and phone-specific styling, not only the global background. |
| Dream exit fails | Enter the context through its actual route before testing exit. |
| Fog has a sharp edge | Increase area edge softening and inspect alpha-mask edges. |
| UV/effects unavailable | Check WebGL, graphics drivers, tool permissions and required items. |
| Old slot/test state rejected | Keep the old build; replay and capture a state for the new revision. |
Before sharing a game
- Both branches and failure paths are playable; no unavoidable all-locked choice.
- Menus, journal, map, history, inventory and save/load have readable text and a way back.
- Mid-dialogue and mid-sequence save/load tested after restarting
Game.exe. - A copied project and a fresh export load all resources from their new folders.
- Licenses for art, audio, fonts and imported UI packs are recorded.
- No private source documents, author test profiles or personal information are in the game archive.
Report a reproducible bug
Email max.trokay@gmail.com with version/edition, Windows version, a short title, numbered reproduction steps, expected result, actual result and a screenshot or recording. Attach a minimal permitted project with resources when possible; do not send passwords, API keys or private licensed material without permission. Mention whether it happens in the editor, preview or exported game.
The current verified distribution is Windows x64. macOS/Linux/mobile exports, a marketplace backend, AI story generation and physical 3D simulation are not promised here. Minimum hardware has not yet been established through a broad device benchmark. Heavy scenes require testing on the intended machines.
Handbook revision: 0.57.0 · 7 October 2026. Contact: max.trokay@gmail.com.